Wednesday, December 27, 2006

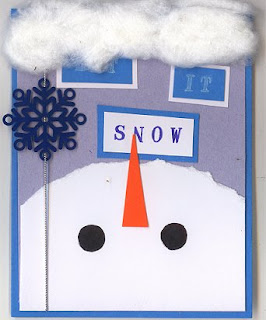
Latest Project-Let It Snow Pocket Card


I truly love the snowman and searched for the related projects recently via Papercrafts Magazine, and finally found this. But I customized it and changed a bit to a pocket card. This is the first time I tried out this kind of papercrafts...I love simple card though but just thought it was fun to make something based on magazine feature project.
Supplies:
Blue cardstock
Light blue paper
white paper
orange paper
white ink-Tsukineko
Alphabet stamps
silver wire
silver brads
plastic snowflake charm
black pen

How to make:
1. Make the card base with the blue cardstock-just make the front card.
2. Cut the light blue paper smaller a bit than the card base. Measure and tear the white cardstock like a snowman.
3. Cut the orange paper triangled to be the nose of the snowman and paste on the snowman as the picture shown and draw two small black circle as the eyes.
4. Stamped "Let" " It" "SNOW" on the blue and white papers as picture shown and mount on the white and blue papers.
5.Place and paste the snowman and stamped pictures on the light blue paper as picture shown.
6. Place the silver wire through the plastic snowflake charms and glued over the other side of light blue paper.
7. Make the pocket, the size slightly smaller than the card base.
8. Glue the red snowman ribbon on the pocket.
9.Cut a strip of blue paper and glued some cotton on it to make the snow. Place the brad and the silver wire on the behind of the paper . Place another brad on the pocket as picture shown.

I really had fun to make this pocket card and hopefully whoelse received it will be happy to use it too !!!

Saturday, October 28, 2006

Completed all my swap !!!!

Phew!! What a hectic and stress but surely FUN weeks with making all these swap to be completed, and finally I DONE them all and mailed them out today !!!!!

Now I can shake my legs to start my christmas cards, some RAK.....Have you start to make your christmas cards?

Because Eva is too curious.......


so I display my glue book to Birgit here.....any comments, questions are welcome..:-))
Birgit and I LOVE anything vintage so it was easy for me to create something for her, what I love is what she love, isn't it right, Birgit ? :-))
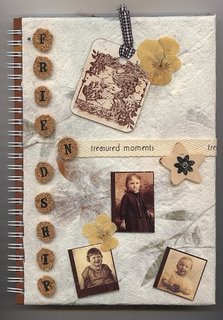
So, I made this glue book with something vintage theme. I firstly wrapped the spiral bound book with handmade papers that my brother bought specially for me from Bangkok last year. It has beautiful flowers' petal and leaves in the handmade papers. I've seen this handmade papers factory in Chingmai ,Thailand with my hubby in 1996, it just something fun and interested when the workers making the handmade papers.Ok, back to my topic today..:-))
After I wrapped the note book with handmade papers, I stamped "friendship" on cork paper then I glued them with crystal lacquer,the result was excellent.. It was really fun and the result look vintage, I think.Then I stamped the women stamp on the formica chip which I distress with the distress ink pad first and tied with black and white gingham ribbon,my favourite ribbon.
Fabric words ribbon was added on the centre of the cover and I added some vintage pictures( I LOVE them soooo much !!!!) and some dried flowers.
Actually the fabric words ribbon was tied and glued to the inside cover , and I glued a white heart paper, then I made a bookmark for Birgit too...unfortunately I forgot to scan the inside cover.
What do you think ? I LOVE my glue book too :-)) I had fun , fun , fun to make it, specially for my friend , Birgit.

Tuesday, October 24, 2006

Glue Book


Do you know what is glue book? I also don't know at first. After I received from my friend Birgit, from Austria , I just covered and hooked on glue book. Oh , what a beauties!! You will really getting addicted into it !! Look at the glue book Birgit sent to me , this is really a master piece!!

Today I had the motivation to make the glue book too to send to Birgit, oh my, I really had fun, fun, fun into it....and the result ......I was really happyyyyyyyy for it !!!!!!!.As to suprise Birgit I will display the glue book here after she received it.

Saturday, October 21, 2006

Productive Day


WOWWWWWWWWWW !!!!!!!!!! I can't believe I have done all the 15 calendar pages of April,2007 for IRSAL in half day !!!!!

I also done 5 handmade cards for different groups,

Asian cards for Stamphappystampers,October technique swap for Cardworkshop,Simple card,brown card and stamping on vellum for RRM .

You can view my cards via my photo album .

I was really happy today because I haven't made so many cards in ONE day!!! YIPPEE!!!!!!

Saturday, October 14, 2006

Starting to make cards


As my son's final exam is over then I have lots of time to stamping and cardmaking, I can make cards in these 3 months, YIPEEEE!!!!!!!!!
Well, do you know how many cards should I make? and the dealines is the end of october.Let me tell you !!


a.the remains 14 pages for Handmade Calendar ,April 2007,this is for IRSAL
b.Oriental swap for Stamphappystampers
c.Cards with scripture swap for Stampinginfaith
d.October Technique swap for Cardworkshop
e.Friendship card and glue book swap for Creativemom
f.Brown card swap for RRM


So, you can imagined my time will spend on the cardmaking and stamping,wish me luck to finish them on time!! I have stop now to start stamping !!! :-)))

Friday, October 13, 2006

My students' cardmaking class


I had a cardmaking class for my students today. Actually they had their final exam and the syllabus had been covered, so we have a lot of time to do other thing in class. I am their Malay language teacher and I had this cardmaking class today with them,(language=Arts??LOL) and I just can't believe how much they enjoyed the class, and they even begged me to teach them every week !!!
Well, what had we do ? I borrowed from the Arts department the paper punches and decorative scissors. The students bought their own of color papers and cardstock.
What a big suprise, they asked me how to measure 12x12cm? and how to cut out the cardstock, oh my, I laughed a lot and asked them what had you learned from these past five years?
Everyone asked me to cut the papers for them, I demontrasted the cutting and let the others do their own.They had fun played the paper punches and the decorative scissors.We made the Thank you card today.The result are quite OK, as they are very beginner in cardmaking.
If I had chance next week, I will having another class, and hopefully I can show you some of their cards, when they are skillful enough .

Monday, October 09, 2006

Handmade Calendar April 2007


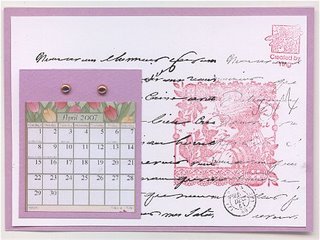
Yesterday I made this calendar for my stamping group, IRSAL.

I had tried out several times on the scrap paper but the final result are not suit my taste. I even can't make it sometimes, my idea was burn out.I need to make 15 pages all of them in the similar design, so it was challanging for me.We will combine and binded all the 12 pages which included different creation from other members. Fun huh ?

Well, I love vintage and want something different on my design.I have distress ink which I bought recently and wish to use it. But, I had printed out the calendar and seems that it was not suit with the distress ink and vintage-style.

So, I just mixed and match some of the rubberstamps and tried out many designs on the scrap paper. I love the old scripts stamps and the women too, I use black and plum ink to stamp them out. Layered on the white and light purple color paper, that's !!! I was happy with the result, what do you think ?
http://groups.yahoo.com/group/IRSAL/?yguid=42176619

Saturday, October 07, 2006

Paper Crafts Magazine to Launch National Card Making Day

Paper Crafts magazine, America's top crafting magazine for nearly 30 years, will kick off the first annual National Card Making Day, Saturday, Oct. 7. From this year on, the first Saturday in October will celebrate the very personal connection a handmade card creates between friends and family, and kick off the holiday card-making season -- the most popular time for creating and sharing handmade cards.

During the week leading up to National Card Making Day, the Paper Crafts Web site, www.PaperCraftsMag.com, will provide fun and attractive card ideas, card-making tips, suggestions for group activities and projects, and recipes for snacks. On Saturday, Oct. 7, the Paper Crafts Web site will post hourly projects and giveaways.

You can check it out at:http://www.papercraftsmag.com/paperparties/ for the fun and resourceful informations.

What could you do with a piece of paper?

1.Stamp it
2. Ink it
3.Cut it
4.tear it
5.crumpled it
6. punch it
7. stamp and ink it
8. Ink and cut it
9.Cut and tear it
10.tear and crumpled it
11.punch and stamp it
and many many more........

could you tell me more about it ?

Wednesday, October 04, 2006

Received from Addicted to Rubberstamps


Hooohooo...I received a box of stamping supplies from addictedtorubberstamps.com( I bought them for sure,LOL) which are included:

1) vintage Merry Christmas stamp
2) Poinsette collage stamp
3) Suprise stamp
4) Moo Birthday
5) Brown color paper pack

Friday, September 22, 2006

Page Maps

You can view fabulous card map from this website, I love it very much and definately come back often.http://www.pagemaps.com/index.htm

Monday, September 18, 2006

The Stamping Blog

I found this blog just now and wow, it's resouceful and you can find what you want about stamping there.
http://www.aboutweblogs.com/stamping/

Sunday, September 17, 2006


Have you heard about Hero Arts rubberstamps?

I love Hero Arts@ rubberstamps and had used a lot of them in my stamping and cardmaking.For this featured card, I used Quill Embelishments Rubberstamps to make the card.There has 7 rubberstamps in the packet which are:

1.Live Laugh Love
2.Cherish's Life Moments
3.Dream and Discover
4.Friends Always
5.Warm Wishes to You
6.You make me smile

You can view some details about it and some card made with the rubberstamps at Hero Arts Online website:
http://www.heroarts.com/products/productInfo.cfm?ItemNo=LL127&subCat=C01

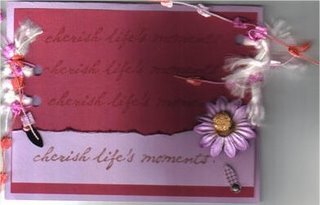
I used Cherish's Life Moments rubberstamp to make the card. Firstly I use Versamark Watermark Ink pad to stamp the words on the burgandy card, then I stamped the word on a scrap purple paper. I added two anchors on the scrap paper,layered the paper and added a small plastic flower.To make the card more stunning, I added some fibers at the side of the card which I punched some holes first to tie the fibers. Viola!

Waterfall Birthday Card


I wish to share with you another birthday card I received . I love it because it is so special. It's called waterfall birthday card, you can see the different when the card was pulled. It was from my dear Connie from USA. Thank you very much Connie you made my day. I wish to try this technique too !!

Map and Rubberstamps


This is my newest handmade card , I always want to try something different or new technique for the cardmaking and stamping. I used the new rubberstamps, old script and map rubberstamps which I bought sometime ago from USA, my big brother was kind enough to bring them back to Malaysia lately, so it safe the shipping fees too. I used the Distress Vintage Photo Inkpad which have vintage effect ,which I love much.
I sponged the cardstock first with the sponge and distress vintage photo inkpad, then I stamped and added the second layer with the old script , looks great huh?
After that I stamped a map rubberstamps and mat on brown paper and finished with two copper brads,I also teared the brown paper and inked with distress vintage inkpad too.
I was happy with the result,although it's simple.

My stamping world


I wish to create this blog special for my stamping and cardmaking....just wish to share the arts of stamping and cardmaking with you all.....well, I have joined many yahoo stamping groups, bought some stuff for stamping, made some stamping friends around the world....made some cards with the rubberstamps....but I just admit I am a newbie in stamping world. Please share and talk about stamping and cardmaking...we can make friends too...any comments and questions about my blog are really appreciated!!

Saturday, September 16, 2006

New Blog


I have my new blog. Hopefully I can always update my blog!!

Footer